
Growing mushrooms can look incredibly daunting. Anyone who has glanced through books like “The Mushroom Cultivator” by Jeff Chilton and Paul Stamets, or attempted to wade through Stamets’ “Growing Gourmet and Medicinal Mushrooms” (GGMM), will know what I am talking about: The technical terminology, expensive equipment, building a growing environment…“omg, I just want to grow mushrooms!”
Luckily, to make growing mushrooms easier and more accessible, a variety of Guerrilla techniques exist that allow beginners to quickly start the journey of mushroom cultivation. You could opt for a mushroom grow kit—but growing from scratch can be a lot more rewarding and cost effective so that’s what we’ll cover here.
A key aspect to growing mushrooms is knowing where mushrooms grow naturally, reproducing the climate they like, and mimicking the substrate (their food source) on which they grow. Psilocybe cubensis, for example, are easy to cultivate because creating an artificially warm and humid environment is easy, while the substrate that supplies their nutrient needs can be made from ingredients that you can purchase in your local grocer.
With a few basic skills, some practice, and a clean area to work, many different varieties of mushrooms, including the magic varieties, are relatively easy to grow. There are more than 100 different kinds of psilocybin mushrooms, but the most popular ones for growing are B+, Penis Envy, and Golden Teachers. Psilocybin spores are legal in Canada and all 47 states, but California, Idaho, and Georgia.
The History of Mushroom Growing
The techniques involved in growing magic mushrooms have come a long way in the last 60 years, from Roger Heim growing Psilocybe mexicana for Albert Hofmann to Oss and Oeric’s (aka Terence and Dennis McKenna) “Psilocybin: Magic Mushroom Growers Guide.” There is now a range of accessible books by authors such as Stamets, Peter McCoy, Tradd Cotter, and Dr. K Mandrake and Virginia Haze, the teachers in our mushroom growing course and the authors of “The Psilocybin Mushroom Bible.”
How to Grow Mushrooms as a Beginner
A lot of the older growing guides, including those by Stamets, required a medium skill level, a good lab technique, some homemade lab gear, and excellent working knowledge of agar and growing from grains.
How to Grow Shrooms Bundle
Take Both of Our Courses and Save $90!
This started to change with the introduction of the PF Tek, a simple technique which allowed people with minimal skills and no knowledge of lab technique to grow mushrooms at home easily. (“Tek” stands for Technique—a term commonly used within counterculture citizen science projects.)
Briefly, this article is going to cover the following:
● Basic supplies and equipment
● Still Air Box (SAB) & Shotgun Fruiting Container (SGFC)
● Spiderman Tek aka Uncle Bens Tek (which we chose to teach in our course)
- PF tek
● Incubation/ Colonization
● Growing, including bulk grows and casing
● How to Dry Mushrooms (you can also watch our video on drying, here)
Supplies for Growing Mushrooms at Home
You will, of course, need spores. Obtain a spore print or make a spore syringe. Liquid culture in a syringe will also work for the following teks.
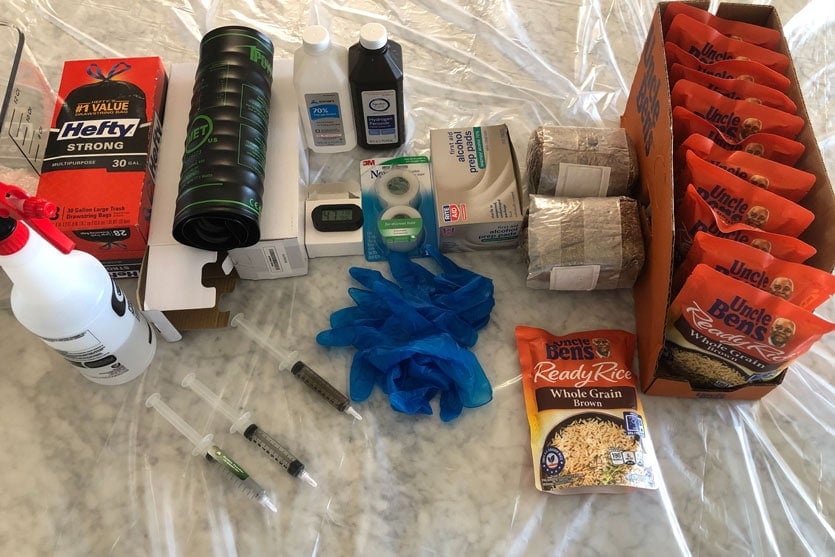
Basic supplies and equipment:
● Alcohol/Isopropyl alcohol/methylated spirits (we like 70% like this one)
● Butane torch, or camping gas lighter
● Water Spray Bottle – for 70% alcohol/methylated spirits
● Water Spray Bottle – for water
● Scissors
● Aluminum Foil
● Micropore tape
Still Air Box (SAB) & Shotgun Fruiting Container (SGFC)
**Note a SAB is optional and there are also many kinds of fruiting chambers, but we choose to teach SGFC in this guide**
● Plastic storage boxes
● Medium-sized tin can
● Drill and a 4-12 mm step Drill Bit or Soldering Iron
Incubation/ Colonization
● Heating mat for reptile closure / Horticulture
● Power supply + thermostat
Growing, including bulk grows and casing
● Gypsum
● Vermiculite
● Perlite
Drying
- Dehydrator. Note: this is optional, you can also just airdry your mushrooms on a sushi mat, but a dehydrator is the best way to go.
Spiderman Tek aka Uncle Bens Tek (which we chose to teach in our course):
- Instant Brown Rice. This is the go-to brand. It’s good to buy them in bulk like this and plan on inoculating at least 10 bags, because the probability that some of them will get contaminated is pretty high your first time.
PF Tek:
● Glass Wide Mouth jars with metal lids for PF Tek
● Glass Mason jars or recycled glass jars for bulk grows
● Hammer and Nail
● Brown Rice Flour
● Pressure Cooker, or large cooking pot with lid
Many of these items can be bought from hardware or garden supply stores. Other items can be purchased from your local grocer and pharmacy.
Notes on particular items: Spores—there are a variety of websites that sell spore syringes, or you can make your own from a spore print. (Here’s our explainer and video on where to buy psilocybin spores.) Wide-mouthed glass canning jars for the PF Tek can be bought brand new from homewares stores or catering suppliers, as can Mason jars—or you can collect and reuse glass jars with matching metal lids. Some jams come in wide mouth jars so keep an eye out if you cannot afford the more durable canning versions from homeware stores. You will need either ethanol or isopropyl alcohol which can be obtained from pharmacies—or methylated spirits, which is a standard supermarket product. The alcohol or methylated spirits need to either be 70 percent or diluted to 70 percent. Micropore tape can be purchased from most pharmacies or can be found in some supermarkets in the medical area near bandages. Micropore tape is a tape that has pores smaller than 2 nm (nanometres) which allow air movement but limits larger sized particles. Perlite, Gypsum, Vermiculite, and Coco Coir can be purchased from gardening and hardware stores.
Read: Where to Buy Psilocybin Spores
Note on pressure cookers: There is a huge range of pressure cookers available from homewares stores or catering suppliers. This one is a compromise between price and quality. A good quality stainless steel pressure cooker that reaches 15 psi is recommended. Don’t skimp on this—i.e buy a dodgy pressure cooker from a junk reuse shop—as they can explode. Make sure you read the manual and understand its usage before you use your pressure cooker. A good sized pressure cooker between 7 to 10 litres is recommended for average use. If you feel passionate about your interest and feel you are going to be doing a lot you could invest in a 22 litre Hawkins Big Boy, or lab grade autoclave. Again, It is worth investing in a quality product. This is not needed for the Uncle Bens tek, but it is for PF tek.
Growing Your Own Mushrooms: PF Tek vs. Uncle Ben’s Tek
Two of the most popular teks if you’re new to growing mushrooms are the PF Tek and the Spiderman Tek (i.e. Uncle Ben’s), the tek we teach in our beginner’s course on how to grow mushrooms. We’ll teach you the basics of both in this article. There are several stages to the mushroom growing process: inoculation, colonization, harvesting, drying, and storing. To be clear, whether you choose the PF Tek or Uncle Bens Tek will affect the first stage of the process: inoculation. But once your mycelium cakes have colonized and you transfer them to the shotgun fruiting chamber, the technique is the same.
The PF Tek has been a popular method for home cultivation since 1991 because it is easy and reliable. The materials needed are cheap and widely available, especially once you invest in your original setup. A good sterile technique is necessary when inoculating—adding spores or mycelium—to jars (for PF Tek) or rice bags (for Spiderman Tek). But by being careful, the risk of contamination from airborne spores or bacteria is small, especially when using a Still Air Box* (more on that below), because air exposure is minimal and the layer of vermiculite we add to the top of the substrate acts as a filter.
There are more than 100 different kinds of psilocybin mushrooms, but the most popular ones for growing are B+, Penis Envy, and Golden Teachers. Spores are legal in Canada and all 47 states, but California, Idaho, and Georgia.
As with any mycology technique, cleanliness is key. Before you begin, it is recommended to wear food-safe gloves and a mask throughout the process. Not only do the gloves protect you from the alcohol, etc., but your skin carries a variety of bacteria, and you are continually losing skin to the air around you. Wipe down the area you are working on with the alcohol or methylated spirits, be it the kitchen bench, or the Still Air Box you may be using. Wipe down all your tools and then wipe dry.
*The level of your success is proportional to your cleanliness.*
Before you begin, you may need to set up some equipment. Let’s start with making a Still Air Box (SAB). A Still Air Box is a small space that can be kept sterile with no air flow. Incredibly useful if you are working in an area that is difficult to clean (your back shed or garage), where you may expect regular interruptions or air movement (such as your kitchen, especially if you have housemates). If you have a space with no air flow and can clean well, a SAB may not be necessary for these Teks—in theory a SAB is not necessary for the Spiderman Tek. Our advice is to develop good habits and be as clean as possible to minimize contamination.
Growing Mushrooms with a Still Air Box
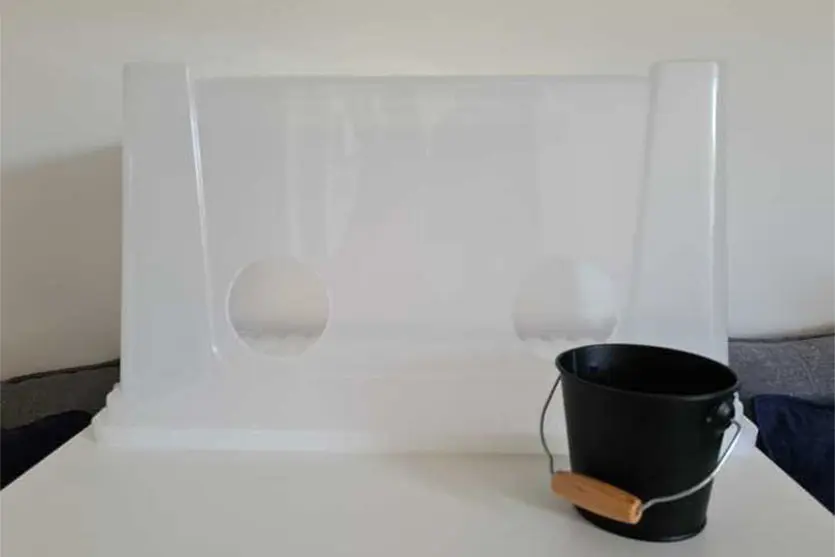
*A Still Air Box (SAB), or “glovebox,” is a sealed container that some people use to help limit air movement and keep contamination out of their grows. You can buy one or make one using our guide below. Some have gloves physically connected to them so once sealed the contents remain sterile, but with caution and good technique this is not altogether necessary.
What you’ll need for your still air box:
● Plastic storage box (53 quart is ok, but bigger boxes will provide more room)
● Medium-sized Peach tin, or tomato tin (800g to 1kg)
While it is optional, a Still Air Box is highly recommended—it also makes cleaning more manageable. Most SABs are made from large clear plastic storage boxes (although my first SAB was a cardboard box with a cling wrap window!) with two holes cut for armholes. The plastic in most plastic storage tubs is brittle, so rather than trying to cut holes, heat a medium-sized tin can (a medium-sized 800g/1kg peach tin or tomato tin) till it is hot and then being careful not to burn yourself, cut two holes in the plastic with a placement where you think your arms would feel most comfortable. The hot tin should cut the plastic effortlessly—best to do this outside. As mentioned, consider the placement of the armholes before you cut, in time you may find yourself working longer and longer hours, so comfort is essential.
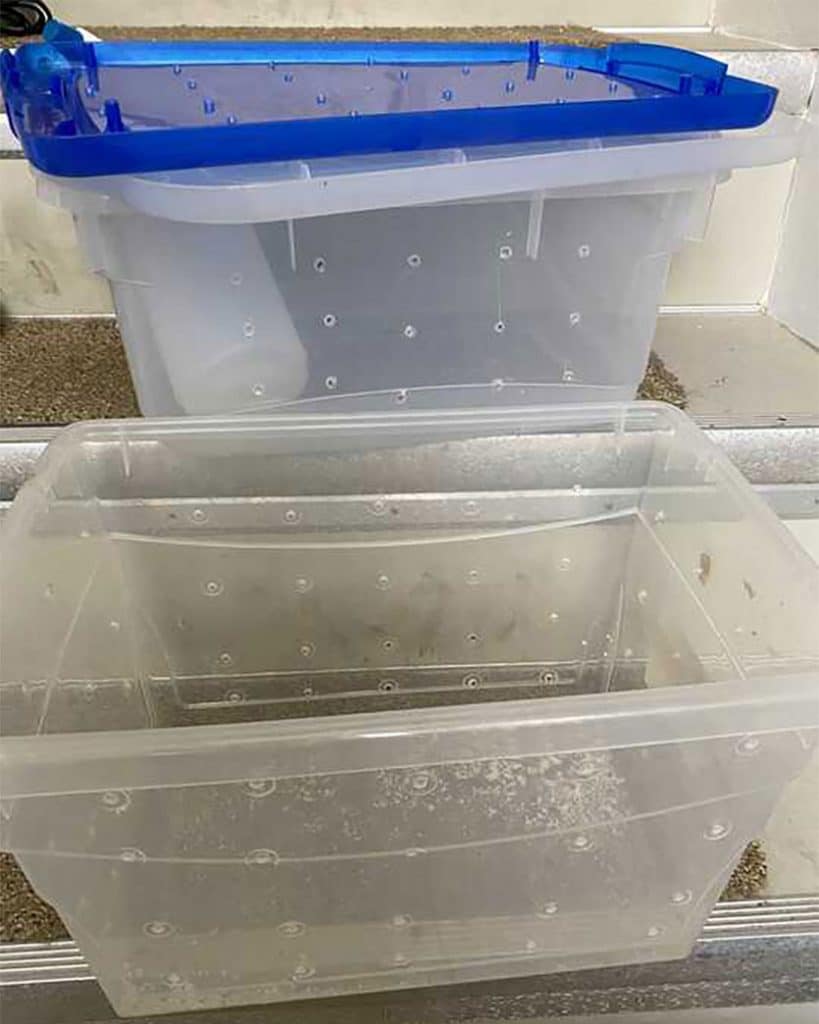
Shotgun Fruiting Chamber for Growing Mushrooms
Fungi need specific environmental conditions to fruit, a change in CO2 levels, regular fresh air, and a constant humidity—a closed environment where these conditions can be maintained is essential for triggering the fruiting process and maintaining a constant environment. Fruiting chambers are essentially the home or planter box for your mushrooms. First, you inoculate (i.e. insert the spores into a substrate like brown rice which is in either bags, for Spiderman/ Uncle Bens Tek, or mason jars, for PF Tek). Then, once the spores have germinated and the mycelium has fully colonized the substrate (you’ll know because it will turn into a white mass), you migrate the colonized mycelium cakes into your fruiting chamber for the mushrooms to grow. Fruiting chambers can get complicated, with humidity sensors, fans, humidifiers, piping, and timers, but you can start simple with a shotgun fruiting chamber. It’s essentially a plastic tub that has tons of holes in it as though someone shot it a lot of times with shotgun pellets, hence the name. If you are only growing a small amount of mushrooms, a layer of wet perlite in a confined space is all you need to create the necessary humidity necessary for the mushrooms to grow. You can use a SGFC to fruit PF Tek cakes, Spiderman Tek rice satchels, or bulk grows in plastic/foil trays—sitting them on the perlite and using the lid to fan the contents twice a day, you create a very effective growing environment.
SGFC’s form the basis of a more advanced Tek, the Monotub, where the mycelium is grown on grains, and the whole tub becomes the fruiting environment. This is what we teach in our course.
What you’ll need for your shotgun fruiting chamber:
● Perlite
● 4-12 mm Step Drill Bit
● Marker Pen
● Ruler
● Micropore tape
Using a ruler, mark out the holes in a 10 cm grid on all four sides of the box, offset the holes vertically, so the holes form a diamond shape. Leave at least 5 cm from the base without holes. Drill the holes on the marks to the full size of the 4-12 mm step drill. The plastic in many of these types of boxes are quite brittle, so the step drill allows a slow increase in size—standard drill attachments have a tendency to cause the plastic to fracture. A really quick but toxic alternative is to use a soldering iron to melt the holes. Cover all the holes with micropore tape to allow airflow, but to stop unwanted spores or insects.
Fill the tub with perlite so that it is approximately 5 cm deep—sitting just below the lowest holes—and add enough water so the perlite becomes moist, but does not float on a layer of water. You can add a small amount, 5-10 mL of three percent hydrogen peroxide solution to help keep the perlite clean—while perlite is inert and contains no nutrients, in time you may see algae growing on the perlite.
Read: How to Take Shrooms
The moist perlite will maintain the necessary humidity for the mushrooms to grow. Fungi breathe in oxygen and breathe out carbon dioxide (CO2). As CO2 is heavier than air, the holes in the container will allow the CO2 to seep out of the holes near the base and fresh air to be drawn in to replace it—lifting the lid and using it to fan the tray every day is advised. Mushrooms need regular fresh air, so remember to use the lid to fan the container at least twice a day.
Place the cakes/bulk substrates into the fruiting chamber only when they are fully colonized—when the substrate is all covered with mycelium and the mycelium starts becoming thicker. You don’t want to do this before then, as having exposed uncolonized substrate can introduce contamination—you only need a small bit exposed for contaminants to get a foothold. Mycelium is at its strongest when the substrate is fully colonized, it realizes there is no more food and begins the process of digesting the substrate to produce mushrooms.
The PF Tek: Psylocybe Fanaticus
Psylocybe Fanaticus, shortened to PF, was the business name of Robert ‘Billy’ McPherson—aka Professor Fanaticus—who pioneered a method of mushroom cultivation called the PF Tek. Initially, the PF tek used organic rye berries (rye seeds) but later simplified to use brown rice flour and vermiculite. The substrate is sterilized in wide-mouthed canning jars by steam sterilization, tyndallization, or pressure cooking, with a layer of dry vermiculite as a filter to keep out competing bacteria and fungus.
How to Grow Shrooms Bundle
Take Both of Our Courses and Save $90!
PF Tek Method: Supplies
The essential items for this Tek are clean wide-mouthed canning jars with metal lids, a spore syringe, brown rice flour, gypsum, vermiculite, 70 percent alcohol/methylated spirits, the flame lighter, micropore tape, and optionally, a Still Air Box (which we show you how to make above).
The first thing you need to do is prepare your jars—make sure they are clean. Next, you will need to prepare the metal lids—you will need to nail four holes into the lids, large enough to fit the syringe needle with a little wiggle room, but not too large as it may increase the chances of contamination.
PF Tek: Step By Step
- Measure out separately vermiculite, brown rice flour (BRF), and gypsum so that they are at a ratio of 2:1:1 (vermiculite: brown rice flour: gypsum)—we provide links for brands we like above. Pour water slowly over the vermiculite that you have in a large bowl while stirring with a spoon. By stirring as you pour, this will help the vermiculite soak up an equal amount of water. Be careful only to add as much water as can be absorbed by the vermiculite. Then add the BRF and mix well—you want to coat the wet vermiculite particles with BRF and Gypsum uniformly. Fill the jars with verm+brf+gypsum to 3/4 of the jar, add a couple centimeters of dry vermiculite to the top of the jars. For each jar, screw on the lid and cover with a piece of foil.
- Stack the jars neatly within your pressure cooker or pot (make sure you buy a good quality pressure cooker so it doesn’t explode); you want to stack them in an alternating alignment to allow air movement in and out of the holes in the lids—not directly on top of each other. Use only approximately 5 to 10 cm of water at the bottom—depending on the size of the jars. For the pressure cooker, follow the instructions on usage. With the steam sterilization technique, you may find you have to add some water to the pot during steaming due to evaporation. Using a large pot to steam sterilize the jars will not guarantee all the contaminants are killed. Keep a close eye on the jars in this scenario.
- Sterilize the jars, run the pressure cooker for 45 minutes or the pot for 90 minutes and let cool.
- Place the jars in your pre-prepared SAB and mist with 70 percent alcohol.
- For each jar, remove the foil and inject 0.5-1 mm of spore solution into each hole below the vermiculite layer. Use a torch lighter or (gas stove) to heat the needle of the syringe til it is red-hot. Wait a few seconds for it to cool between each injection. Either while waiting for the needle to cool or when you have inoculated the jar seal the injection holes with micropore tape.
- Once inoculated, you need to keep the jars warm while the mycelium grows—skip forward to the mushroom incubation section for more information.
A Quick Note on using the PF Tek for Bulk Grows
The PF tek and Spiderman Tek will only produce a small amount of mushrooms, but they can both be used as “spawn,” a commercial term used to describe a highly nutritious myceliated substrate that is used to add to additional substrates—in our example we discuss adding coco coir, but you could experiment with pasteurized cow dung—to grow a larger number of more potent mushrooms. Essentially, you bulk out your spawn to increase your yield. When you want to attempt a bulk grow, mason jars or ordinary jars are ok as you will be breaking up the myceliated substrate to mix with the coco coir. Regular jars are easier to find and a lot cheaper than mason jars.
PF Tek Method Summary:
- Wearing food-safe gloves, clean and wipe down your working area/ Still Air Box
- Clean all your tools with either 70% alcohol, isopropyl alcohol, methylated spirits
- Prepare jars, hammer four holes into each metal lid
- Measure out at a ratio of 2:1:1, vermiculite, brown rice flour, gypsum
- Moisten the vermiculite till it doesn’t absorb any more water
- Add the brown rice flour and gypsum to the moist vermiculite and mix well
- Fill the jars 3/4 full, then add 1-2 cm of dry vermiculite to the top
- Sterilize or steam sterilize the jars (see main text above)
- Using a torch lighter or (gas stove) heat the needle of the syringe til it is red-hot. Wait a few seconds for it to cool. This is to get rid of contaminants.
- Gently inject 0.5 to 1 mL of your spore solution in each hole
- Tape over the syringe holes with micropore tape
- Wait. After a while, you should see mycelium growth through the jar
- When the jars are colonized, you can fruit from the cake or do a bulk grow
The PF Tek can be used to grow a variety of species of psilocybin mushrooms—or you can try edible species such as oyster mushrooms or lion’s mane. The PF Tek forms the basis of many other teks including the Spiderman Tek.
Spiderman Tek (aka Uncle Bens Tek)
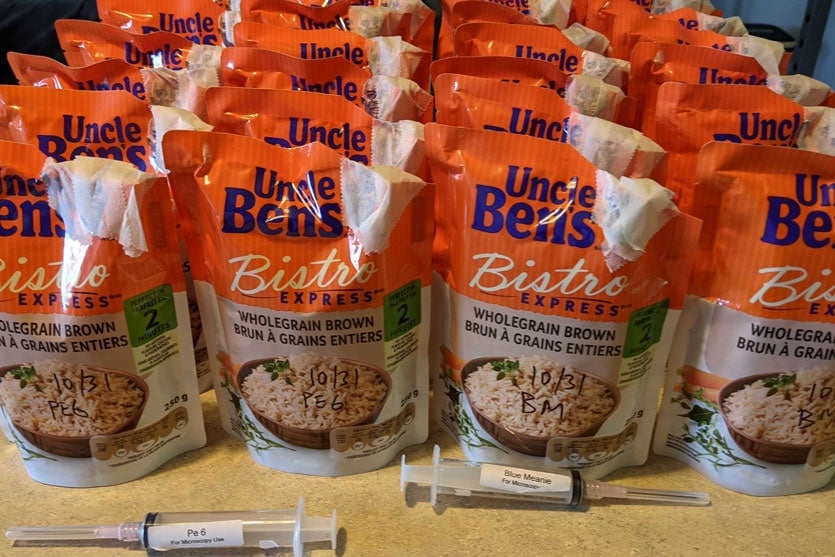
The “Spiderman Tek,” originally known as the “Uncle Ben’s Tek” is a quick, cheap, and low tek way to grow magic mushrooms. The tek is straightforward—you inoculate satchels of pre-cooked rice (conveniently pre-sterilized) using a spore syringe. This is the tek we decided to teach in our course on how to grow mushrooms as we find it’s the easiest for first timers. The tek can be applied to any brand of plastic satchel pre-cooked rice, and potentially any combination of rice and other grain satchels, this is the most popular brand/ kind, though, among growers.
Mushroom cultivation is a rapidly evolving field, and there are always problems to be solved—or shortcuts to be developed. Importantly, how to substitute expensive equipment, create growing environments, or how to grow mushrooms with limited resources—especially when starting (or with a specific harvest in mind!). Mushroom growing forums serve as great incubators for developing new ideas. The idea behind the Spiderman Tek first surfaced on the Shroomery and Mycotopia around 2005.
How to Get Started with the Uncle Bens Tek
The essential items for this tek are the satchels of pre-cooked rice, spore syringe, 70 percent alcohol, micropore tape, the flame lighter, and optionally, a Still Air Box. (see above for links to where you can get these supplies.) This technique is great for first-timers as it bypasses the need for cooking and preparing rice. In PF tek and most other teks, either a pressure cooker is involved, or Tyndallization, which is very wasteful of both time and energy—although effective. In the case of the rice satchels (which you’ll inoculate with your spores), the rice is already fully cooked and sterilized. Most of the hard work has been done for you—all that remains is cleaning your area, and possibly making your spore syringe.
The “Spiderman Tek,” originally known as the “Uncle Ben’s Tek” is a quick, cheap, and low tek way to grow magic mushrooms. The tek is straightforward—you inoculate satchels of pre-cooked rice (conveniently pre-sterilized) using a spore syringe.
Break up the rice through the bag (trust me, I learned the hard way!)—rice sticks together really well, and the dense clumps can inhibit both water movement and airflow, both crucial in terms of colonization. Make sure you clean the satchel as you have everything else.
There are two choices here: some teks recommend snipping off the top corner of the rice satchel, injecting the spores through the hole, and then sealing the hole with the micropore tape. The other option is to pierce the top of the satchel with the syringe, inject the spores, and then seal the hole with micropore tape. Regardless of which approach you take, use a torch lighter or (gas stove) to heat the needle of the syringe til it is red-hot. Wait a few seconds for it to cool, insert into the satchel, and gently inject 1 to 2 ml of the spore solution. Depending on how you made the hole seal it with micropore tape.
Once inoculated, you need to keep the rice bags warm enough while the mycelium grows—skip forward to the mushroom incubation section for more information
Uncle Ben’s Tek Step by Step: Summary
- Wearing food-safe gloves, clean and wipe down your working area/ SAB
- Clean all your tools thoroughly with 70% isopropyl alcohol
- Break up the rice
- Using a torch lighter or (gas stove) heat the needle of the syringe til it is red-hot. Wait a few seconds for it to cool. This is essential for killing potential contaminants
- Either a) Snip off the corner of the bag and insert the syringe needle or b) push the syringe needle through the top of the satchel
- Gently inject 1 to 2 mL of your spore solution on top of the rice
- Tape over either the corner you cut open or the syringe hole with micropore tape
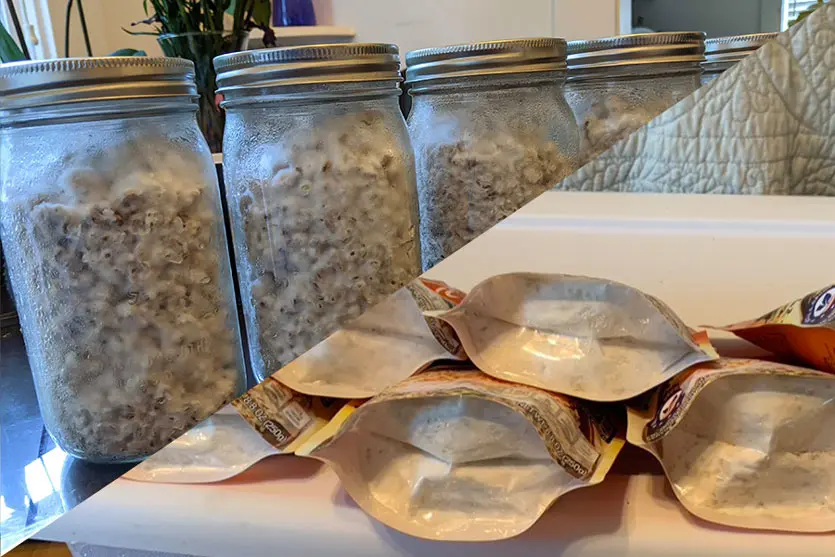
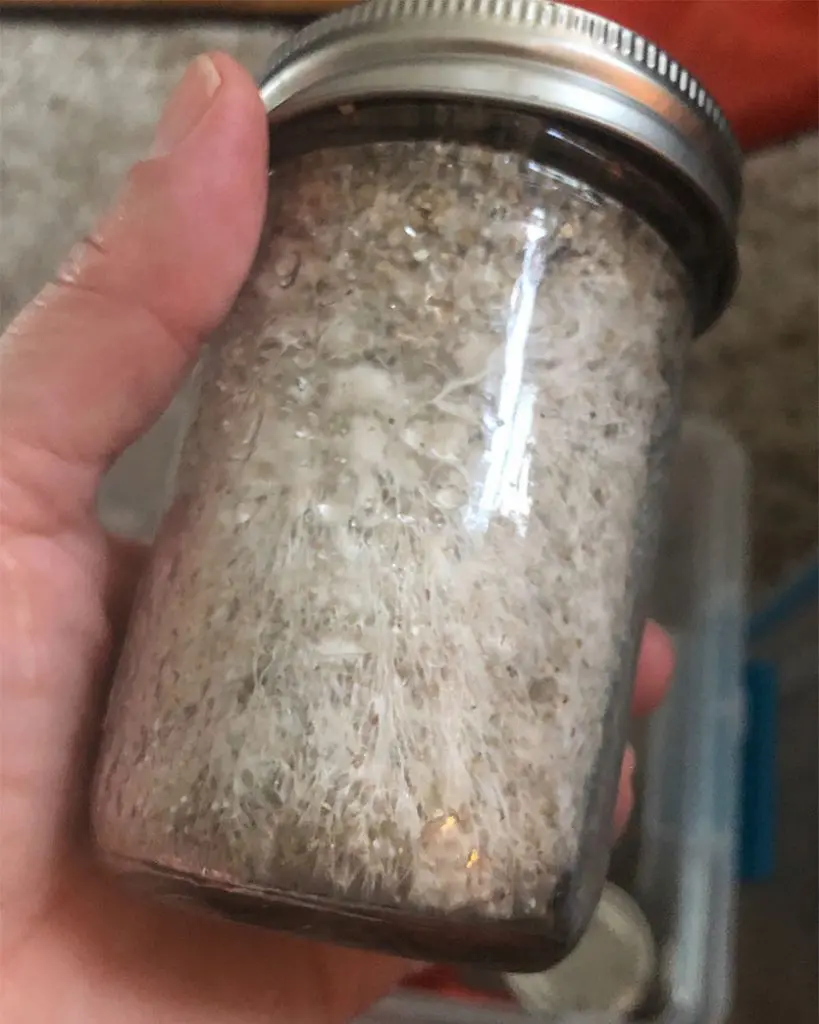
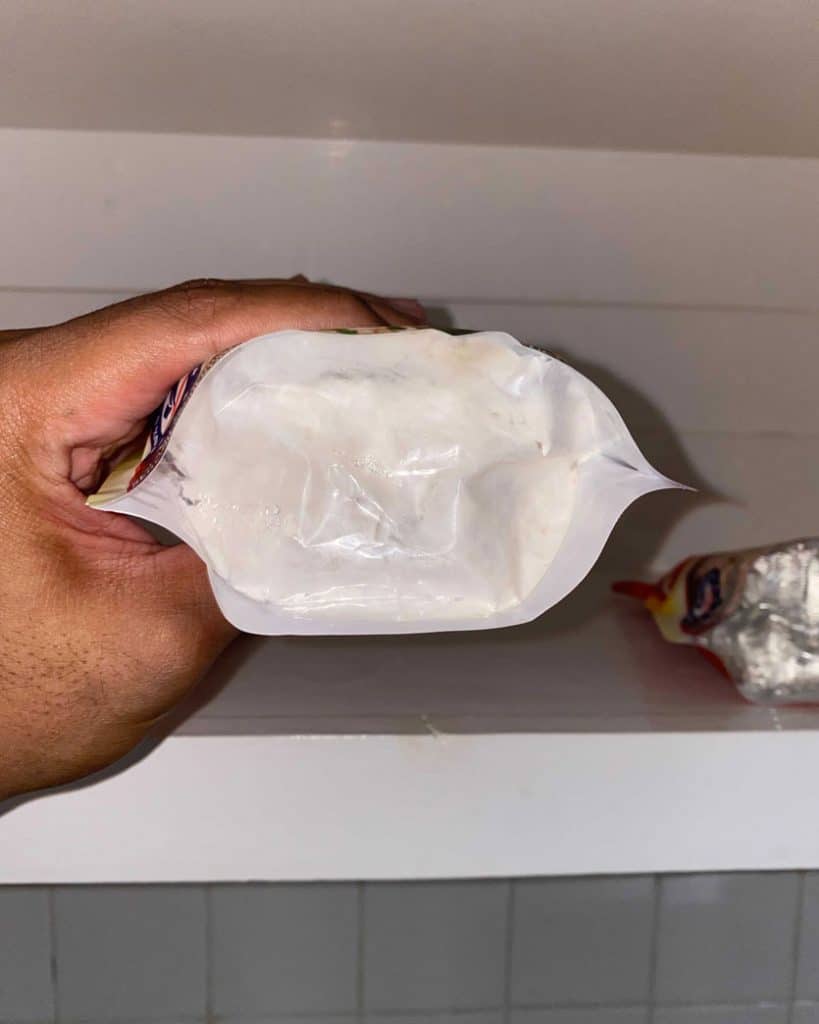
- Now, it’s just a waiting game. Once you’ve inoculated your rice bag with the spores, it can take up to six weeks before your rice cakes are fully colonized. You’ll know because the whole rice bag will turn rock hard and you’ll be able to see that the whole mass has turned white through the window at the bottom of the bag.
- When the satchel is colonized, you can fruit from the bag or do a bulk grow by transferring the colonized mycelium cakes into a shotgun fruiting chamber (as discussed above) with substrate
*Note: this summary is a good way for you to get a sense of what’s involved in Uncle Bens Tek, but if you’re actually going to try it, you’ll likely have a lot of questions along the way. There’s no one right way to grow mushrooms, but having support is helpful as you shop for supplies and attempt this for the first-time on your own**
Mushroom Incubation
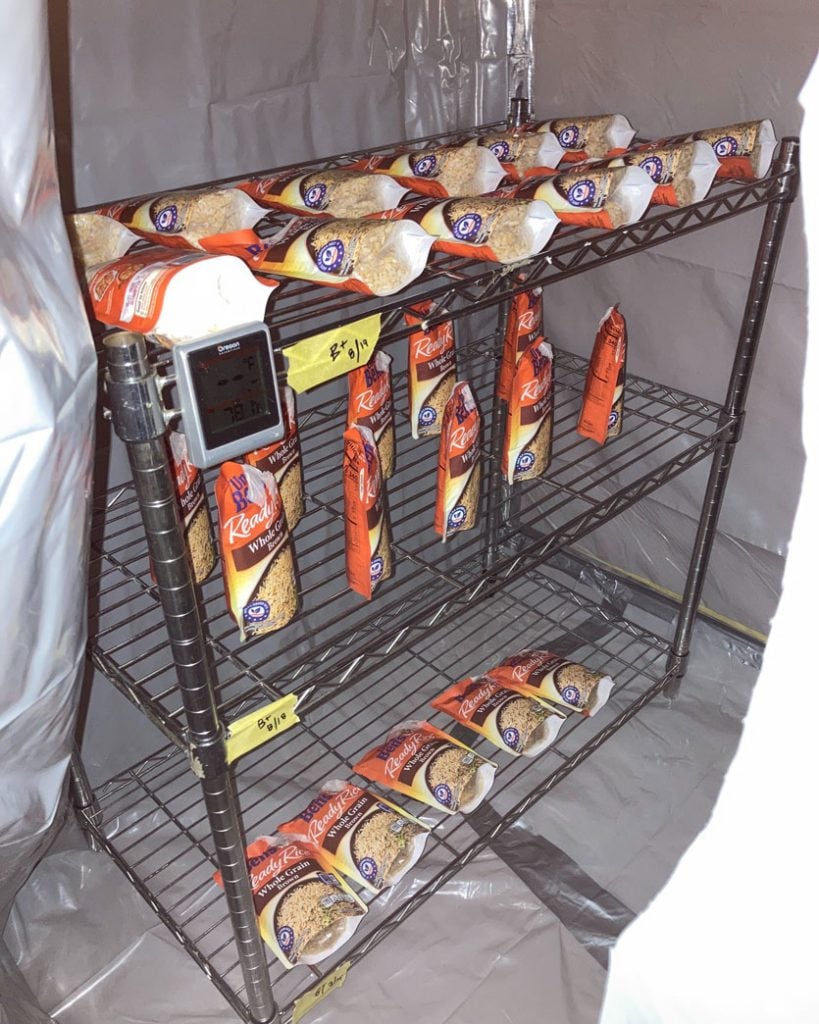
Once inoculated, you need to store the jars/sachets somewhere warm, ideally around room temperature (18 to 24 degrees C) for the mycelium to colonize their substrate. You need to give them some time to start eating their food. This will usually take between two to four weeks, but sometimes can take even longer. If you don’t have an area with a stable temperature, say on top of your fridge or near a heater where it is always warm, you may need an incubator. You also don’t want your jars/satchels getting too hot.
You can create a simple incubator by purchasing a reptile heating mat, or horticultural heating mat, to make an incubation chamber using another plastic storage box. Make sure you use a thermostat controller to maintain a constant temperature. There are more complicated designs, but heating mats tend to make things easier to manage.
Mushroom Contamination
Keep an eye out for contamination. Contaminants spread quickly and don’t take long to become visible if they are present. Contaminants are usually dark green, blue, or black. This is the number one time in which it’s helpful to have support from live mycologists or mushroom experts. A lot of times folks will mistake bruising (which is normal) for contamination and vice versa. For help, check out our mushroom contamination guide here.
Depending on where you live you may want to dispose of contaminated satchels or jar content straight into the bin, do not open them inside as that color that you see is the color of the spores and opening the satchel will distribute them. If you have an outdoor compost, it is safe to add contaminated vermiculite+brf+gypsum, as some contaminants are beneficial in compost.
When the substrate is fully myceliated you don’t need to be as concerned about contamination as there is little space for contamination to take hold, and the mycelium will be busy defending itself. As the mycelium runs out of nutrients, it becomes weaker and more prone to contaminants. Casing layers are prone to contamination, so do keep an eye out for discoloration.
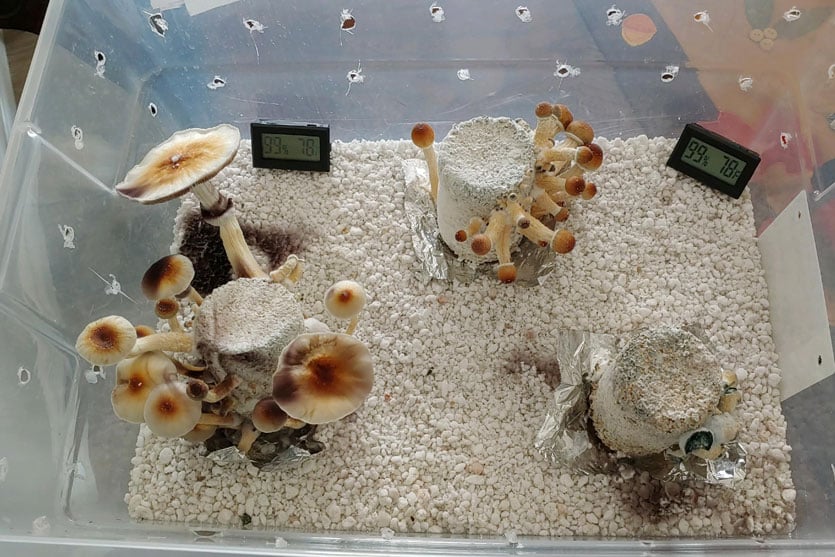
Growing Mushrooms: After Colonization
Once colonized, you can start growing your mushrooms. It is important to note that humidity of greater than 80% is necessary for mushrooms to grow. You could fruit them in your bathroom, but it is best to fruit them in a stable environment such as a Shotgun Fruiting Chamber (SGFC). It is essential to mist and aerate on a regular daily basis. It is best to not mist directly onto the cakes or the mycelium. Mist the walls of the SGFC, or the outside of the rice satchels. At this stage, you will need the coco coir, perlite, and a suitable fruiting chamber. You can either use the shotgun fruiting chamber, or create something more sophisticated—which includes adding fans, timers, and humidifiers. The SGFC will suit smaller grows but in time as you increase the size of your grows you will find you need larger and more efficient fruiting chambers.
Growing from PF Tek
The mycelium will colonize from the top of the jar, where you have injected the spores, down through the vermiculite+brf+gypsum. When you can see mycelium at the bottom of the jar, wait a week to ensure full colonization.
Using the Shotgun Fruiting Chamber, create little foil “islands” for the “cakes” to sit on. Remove the lids of the jar, place the foil over the top of the jar, then turn upside down, tap the jar for the “cake” to drop onto the foil. Place the foil with the “cake” gently in the SGFC, sitting on the perlite layer.
Mist the SGFC and aerate using the lid twice daily, and soon enough you should see primordia form, and then your mushrooms grow!
Growing from Uncle Bens Tek/ Spiderman Tek
The mycelium will colonize from the top of the satchel, where you injected the spores, down through the rice. When you can see mycelium at the bottom of the bag, break up the clumps a bit and then wait a week to ensure full colonization.
In a large clean bowl, add some coco coir and boiled water and cover. The coir will soak up the water and expand. When it has cooled, wearing gloves, squeeze out the water. Before adding the coir, break up the colonized rice, then add a layer of coir. The satchel should maintain some humidity, and you can keep the satchel in the bathroom where it is humid or in an SGFC. If you do use the bathroom to fruit, mist the satchel twice daily. If you use an SGFC, mist and aerate using the lid twice daily, and soon enough you should see primordia form, and then your mushrooms grow. Note: there are a number of substrate recipes and there’s no one right one.
Bulk Grow
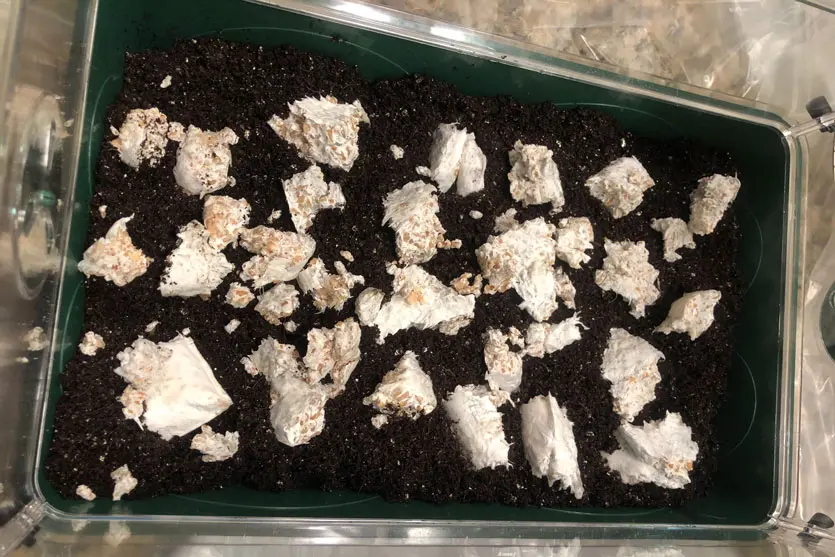
Rather than tap the “cake,” you can spoon out the colonized substrate (rice / vermiculite_brf+gypsum) into a clean bowl—hence why you can use mason jars or ordinary glass jars, too. Using gloves, mix with coco coir using a ratio of 2:1 coco coir to substrate. Then when well-mixed pour into clean plastic food storage containers or foil trays and gently pat flat. Then add a 1 cm layer of coco-coir on top. The increased surface area of the bulk layer allows for more primordia formation and hence more mushrooms.
Read: How to Make Shroom Tea – The Ultimate Mushroom Tea Guide
Use the shotgun fruiting chamber to fruit the mushrooms when using this method.
Variations of this method include waiting a week for the mycelium to bind and then turning the tray upside down and fruiting as a giant “cake,” or slicing up into square cakes as with the ordinary PF Tek.
The process now is to wait, the coco coir will colonize with mycelium, and before you know it, primordia will form and baby mushrooms should appear and grow. In time the mushrooms will grow larger—when the caps open, the annulus (the skirt) drops, and you can see the gills, they are ready to harvest.
How to Harvest Mushrooms
Here’s our full guide on how to harvest mushrooms. Pick by pulling gently from the substrate, being careful not to pull up too much of the substrate or mycelium. Don’t worry about hurting the mycelium as picking the mushroom helps encourage new growth. Clean the base of the mushroom removing any coir or vermiculite that may be sticking to the flesh. It is best to pull whole clusters in one go. It may seem counterintuitive, but picking one from the cluster will disturb the remaining mushrooms, and they will stop growing.
When you have removed all the mushrooms, let the cakes sit for a few days, then submerge them in clean water for 12 to 24 hours, remove and drain. Once drained of excess water, place them back on the foil islands to get a second flush, when you get another batch of mushrooms from the same cake. Keep in mind you won’t get as many mushrooms, and you may start to notice contamination at this point as the mycelium may have consumed the available nutrients.
You can try for a third flush, but you will get fewer mushrooms than the second flush.
Mushroom Flush: First, Second, and Third Flushes
Between flushes, the mycelium will need to rest and consolidate. The mycelium used all the nutrients gathered through the colonization process to produce the first flush of mushrooms, and will then need to accumulate more nutrients for the second and then the third.
How to Dry Mushrooms
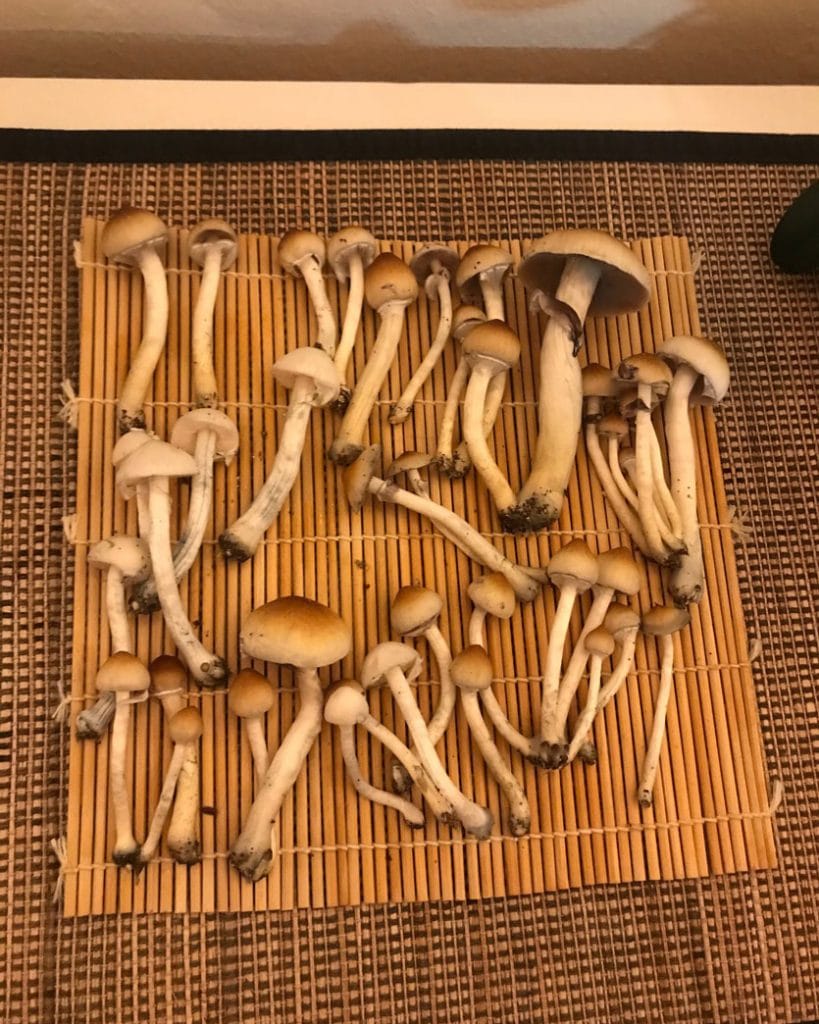
Drying is best done somewhere that has warm air movement. By using a dehydrator—the same kind used to dry fruit—or by leaving the mushrooms on a rack in a part of the house that is warm and dry. They need to be “cracker dry,” meaning they snap easily. Here’s our full guide on how to dry mushrooms.
How to Store Mushrooms
Once dry, store in a self-seal bag (or two—one inside the other) with a satchel or two of desiccant and store in an airtight glass jar or plastic container in a cool dark place. If not stored properly, they can absorb moisture and become moldy or attract mites and insects. Here’s our full guide on how to store mushrooms.
There you have it! How to Grow Mushrooms! Bon Voyage!
Whew! This has been a very quick run-through of the process involved in how to grow mushrooms, from setting up a basic grow environment, work environment, and then the steps involved in using the PF Tek or the Spiderman Tek (Uncle Ben’s Tek) to start growing magic mushrooms. Don’t expect to get it right away! But also don’t assume you can’t do it—once you get the hang of it, it’s so rewarding.
These are the beginning steps, from here once you are comfortable, you can move on to grains, monotubs, working with agar, and then liquid culture. In addition to this guide, we have tons of free videos on our YouTube on mushroom growing. And if you feel called, we’d love to have you join our mushroom growing community, too. We now have more than 1000 people from around the world growing mushrooms with us in our course, and our five mycology experts are available to offer live support and hold your hand every step of the way. Either way, we’re so happy you’re interested in growing mushrooms. It’s a lifelong journey that’s joyous and empowering.
Best of luck, happy growing, May the spores be with you.
Interested in having a psychedelic experience, but don't know where to start? Get our definitive guide on trusted legal retreat centers, clinical trials, therapists, and more.